Ttab Mod Shop Update

Just ordered up an EIS 4000 for the Tanarg build. David - not as nice as yours, but this thing literally can replace every instrument on the panel with 10 times the info. You can see what it all does here:
http://www.grtavionics.com/Default.aspx?id=60
I got all the bells and whistles except for the Airspeed and Fuel Flow upgrades. Now I've got to start thinking about cutting a big hole in my panel to install it. And - what am I going to do with all the extra holes left behind by the other gauges? I'm open for suggestions!
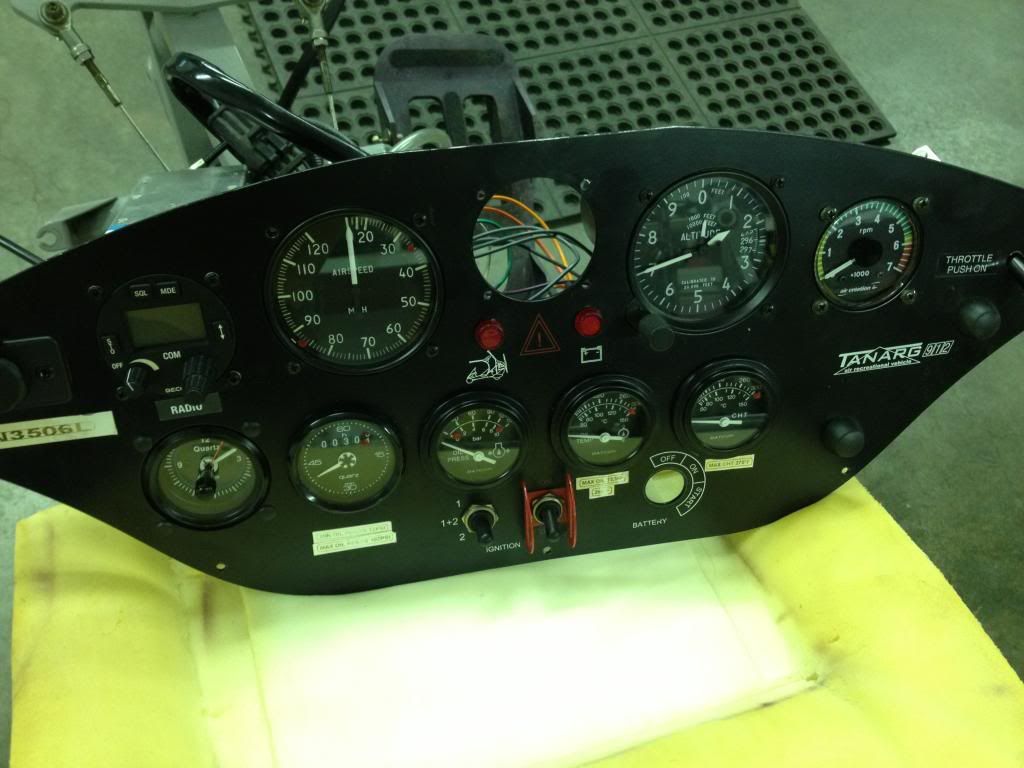
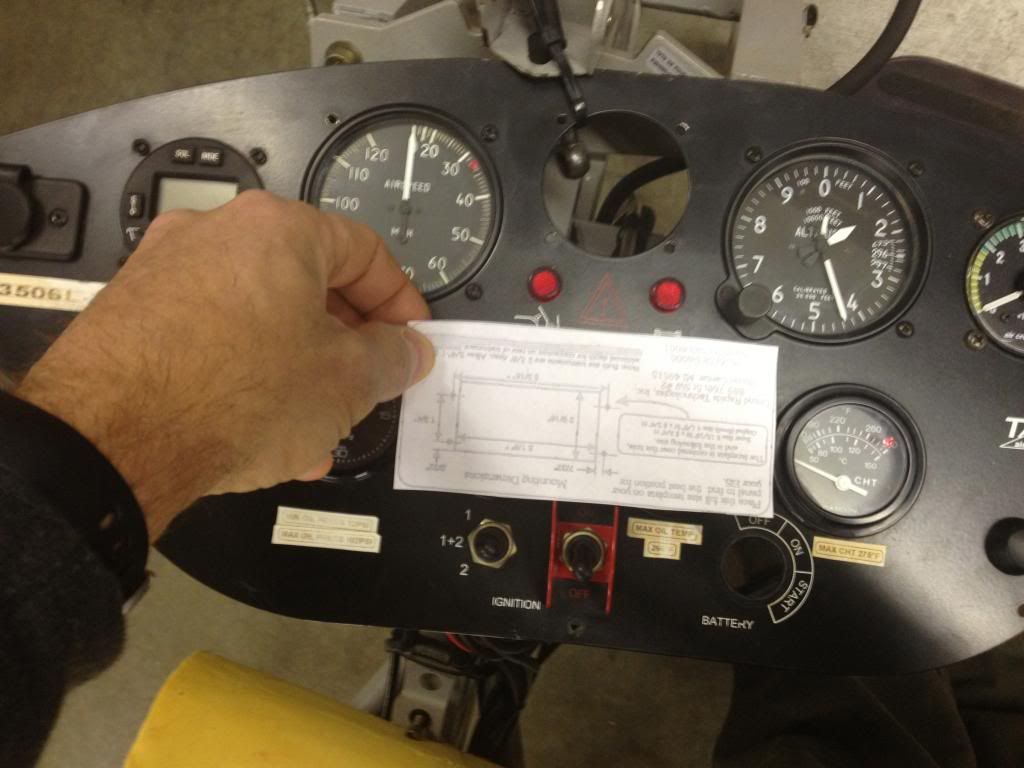
I'll be getting rid of the Hour Meter, the CHT & Oil Press/Temp gauges. I'll keep the RPM gauge as a backup. Next pic here I'm playing around with a template as to where I'm going to have a rectangular hole cut into the panel .....
Moded the cable mixer cover. I used a piece of UHWMP I had laying around and cut off some corner strips ...
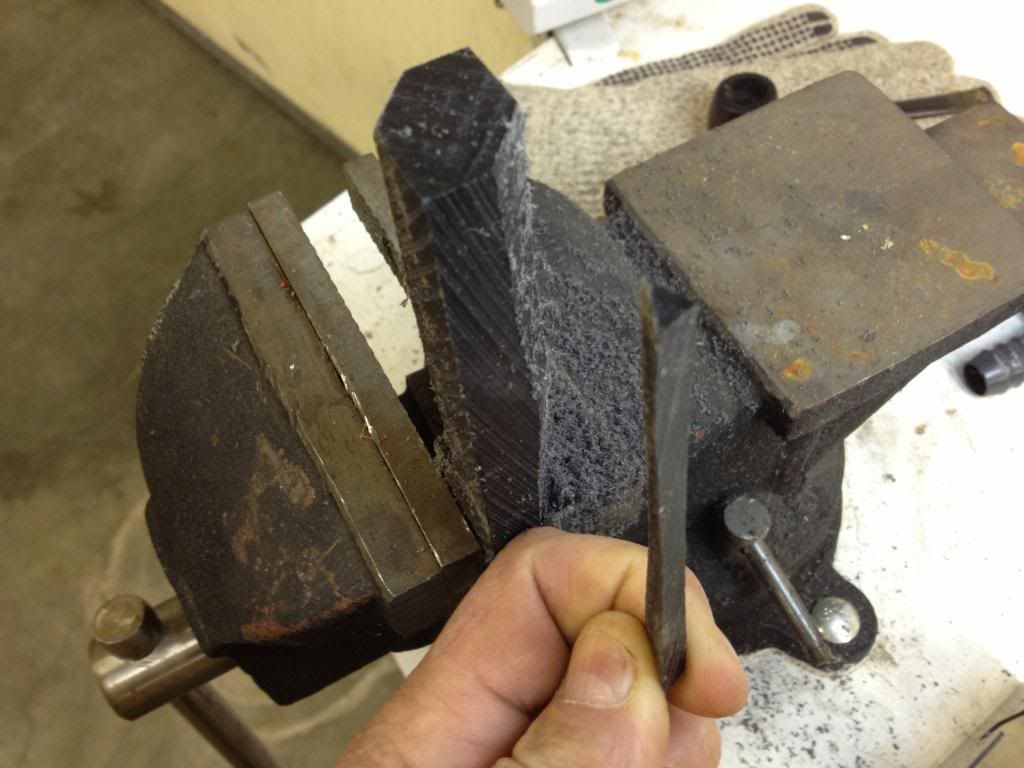
I then glued them into position and filed them down for function. For those not familiar with this mod, it prohibits the flimsy metal flanges on top and bottom from flexing when applying throttle. This flexing problem effects carb balance. What I'm attempting to do here is support the flanges from flexing.
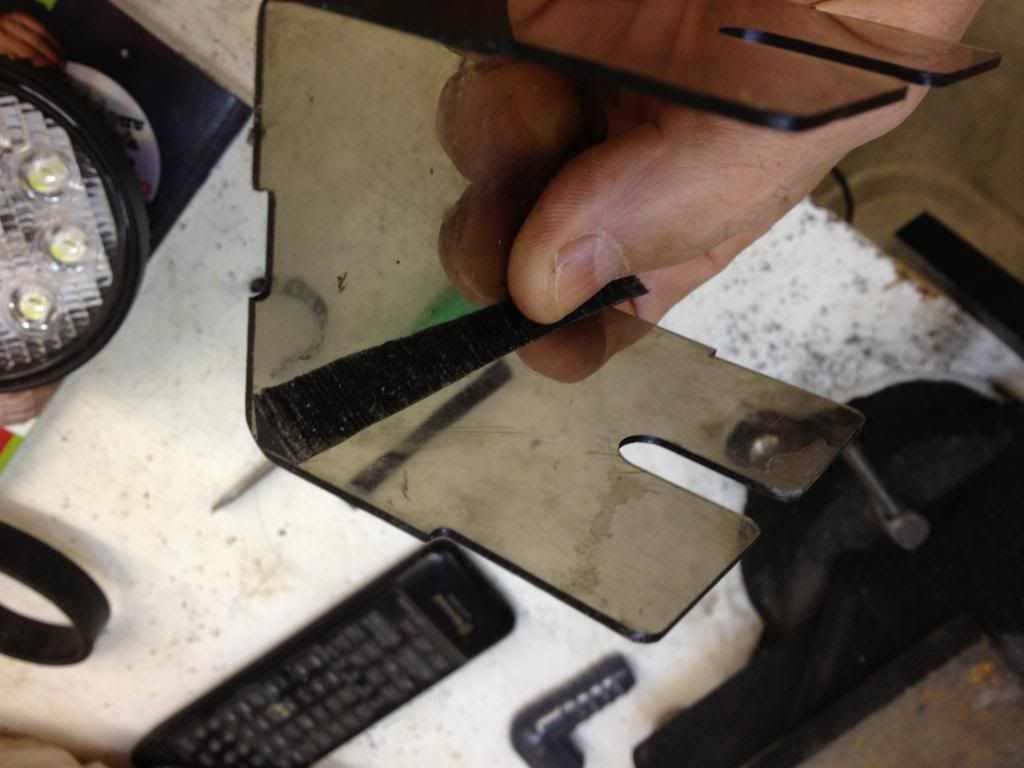
Here you can see how the corner posts now cemented in place on the cover supports the top (and bottom) metal tabs. It's a Tanarg thing!
Comments
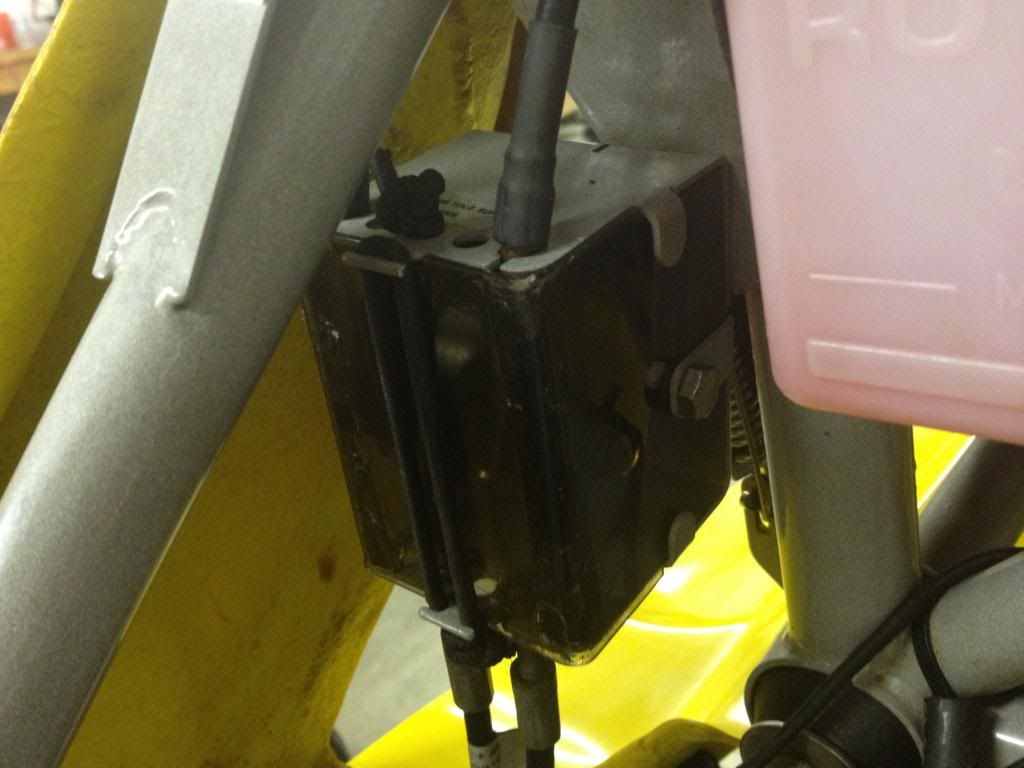
Here I'm starting to play around with ideas as to where I'm going to mount this Racor Fuel Filter. I'm going to have a busy fuel line compared to OEM. I'd like to install this filter, then a fuel flow sending unit, then a 12v electric fuel pump (for back-up), and somewhere on top I'll install a Fuel Pressure Sending Unit. Gas is life!!! I will be eliminating the fuel shut-off valve and those hoses that are draped over the fuel tank.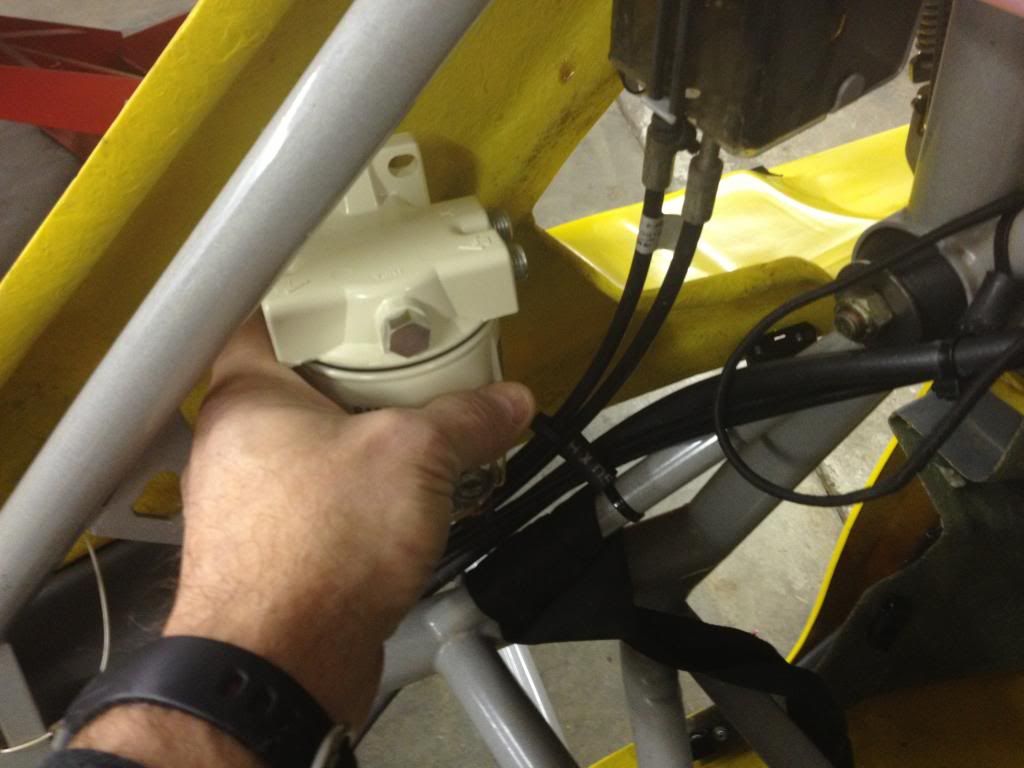
And these things I picked up off of Amazon. They are Seat Heaters! I'm planning on installing them in both seats and locating the control switches up front. At max setting, they'll pull as much as 10 amps each. Good argument for installing an Alternator (hey wait a minute! Did I just say that?)
And finally I'm ready to open up this can of worms. For all you guys flying metric machines, finding bolts and nuts can be a challenge. Since I have many fasteners on the trike that are moderately corroded, I'm changing them out for stainless. Now we get into the grade of bolt debate. Many sizes only come in stainless or the black (oil) coating. I'm sticking with Stainless on any non-structural applications (not involving flight structure that is). So struts, steering, and those types of linkages will be getting replaced. The link to finding these metric bolts is BoltDepot.com. They have it all with usually same day shipping. One thing I'd highly suggest is getting a sizing plate similar to the one I have showing there ....
Oh yea .... Look what I found .....
What is this photo of?
Glad you asked Ken. This is the end of the Mast where the bushings go through and attach to the wing. I found the bushings to be excessively loose, but really attached together like something was holding them in. Finally I got a screwdriver behind one bushing rim and levered the thing out. This is a pic of the other bushing with the metal sleeve (that's supposed to be welded inside the mast there). Remarkably, Air Creations suggested I take this in someplace and get it re-welded! And, if it weren't for the bent mast frame, I'd consider it!
Instead, I'm ordering up a new mast. I'll start with a clean slate (and a lighter wallet for better climb rates!)
Hey Ttabs, I sent you an email with a question about the mast bushing.
In regards to the dash / instrument panel. Just have a new one cut locally out of aluminum (or try cutting it yourself if you've got super steady hands.) Get it all installed, fly with it, then take it out one last time for powder coating and decals / silk-screening-- David Coy has a friend who can do that for you. I have been flying with mine black but ready to repaint / re-label for a year now-- just too much fun flying to take it all apart again!!
Hey, why not get the fuel flow IN the EFIS you got-- fuel flow, especially if linked to a virtual tank and GPS inside your EFIS is THE way to go!!!! Then you get continuously adjusted range-- gone for me are the days of continuously re-calculating and recalculating in my head my gallons, flow and ground speed, versus how far I still had to go and time to do it in.
I wanted to mod the throttle mixer with a better piece of plastic like you used, but didn't have any available-- but it was proof of concept and worked ; ) maybe I should now reorder the plastic cover and do it again?
OK - after further inspection, I found a bent left main. Confirms a hard landing and the reason for the bent mast and possibly the sheared hang point. I inspected the bottom A-arm joints and frame and everything lines up. So, since I have a mast on the way from AC, might as well order up an A-arm ....
It was hard to spot until I got down on the deck and looked at it from the side....
So this is the bulk of what I'm having shipped from France. Should we start a pool guessing the total cost? I'm thinking $1800?.
OH yea - here's hopefully as far apart as I'm going to take this trike. I will be installing 4 EGT sensors, two CHT sensors, and a fuel pressure sensor hopefully this week (if my EIS shows up)
Now for some cool stuff. I was playing around with vinyl adhesive to add some detail to the back cowling. I ordered this pattern up off eBay ...
So, I'd cut pieces out to roughly fit an area, peel, stretch, and stick being careful to smooth out any bubbles. Then I use an exacto knife to get the borders as close as possible ....
A Harbor Freight heat gun works well at really getting the vinyl to suck in and adhere.
At this point the edges look pretty sloppy. So I picked up some gloss black pin stripe adhesive to clean up the edges and finish it off ...
Once positioned and cut, I'd again heat it up with the heat gun to get that adhesive to sink in ....
Can't tell if I'll like this pattern yet, but it looks clean and somewhat professional ...
One idea I had was to completely cover the trike with vinyl entirely changing it's paint scheme. After doing this small project I think it is possible to do and have it turn out reasonable nice looking. I'd suggest you use only solid colors as patterned material (such as what I used) would really screw things up.
So if you're thinking of adding some highlights to your trike, give colored vinyl a try. It's easy and you can always peel it off if it doesn't look right.
Doing a little more work on the HEATED SEATS! They are operated using a three position lighted switch that comes in the kit. Hi, Lo, Off. I'll mount these switches in the instrument panel.
You can trim these kits only length wise to fit your seat cushion...
\
Simple to install. Just have the connecting wire exit the side (rear) of the cushion out of sight. You'll need 10 amps to run each seat (that's two cushions per seat). I guess that just about rules out most of you from doing this mod. The 912 puts out about 14 usable Amps (or there abouts) which would not be able to run everything it needs as well as these seats heaters. So, I'm going to be installing a 40 amp alternator for these bad boys. It'll also power my heated clothing. No more cold days for me!!!
This is great Ttabs, very interesting. Thanks for all the hard work posting your hard work!!
Seat heaters: Soo, if there were a gaseous release of say, a methane rich fuel, directly onto this heat source ....
The layout of your page makes me want to modify mine. Well done Ttabs! Keep it coming.
I just found a good deal on PowerBurst position/strobe lights. These lights are awesome and right now, you can save $130 by ordering up factory seconds ....
I love my Aveo PowerBurst Strobes- I got them a couple years ago when prices came down for them a bit from the typical astronomical for all LED lights. I'd jump on this deal if I were you.
The lights are nearly bullet proof- solid acrylic not thin glass or plastic. No yellowing or crazing on mine so far.
HERE's how I mounted mine:
WANT TO REPLACE YOUR SCRATCHED UP WINDSCREEN?
This smokey windscreen has some pretty good scratches and scuffs - all signs of being well used. My DTA also was getting to the point of needing replacement before I sold it. So I thought this was the time to try building my own windscreen from a sheet of Lexan.
I found a supplier here in Spokane and purchased a 4x8 foot sheet of .06 thick Lexan for about $100. Next stop was to Harbor Freight to pick up a pair of large sheers to do the cutting.
It's a straight forward process fellas if you want to rebuild or re-design your windscreen. Here I outlined my original on to the fresh Lexan sheet ....
With the large HF sheers, just make your cut.
It's a pretty good edge if you're steady enough. I'll use a sanding block around the edges just to smooth things up.
Since I'm a snowmobiler, I have a few old windshields laying around. So I removed the molding off one and it fit nicely on this new windscreen. You can also find this trim on Amazon or ebay. When I'm ready, I'll use adhesive to keep it in place ....
The final step for me is to drill the mounting holes. I could use regular drill bits but the supplier offered to let me use his special drill bits designed to cut plastics. It will leave a cleaner hole. I test drilled some holes in a scrap piece and while it was OK, I'll take my project to his shop and compare results.
So, for now the new windscreen is nearly complete ...
BUT - there is one more distinct advantage here of making your own windscreens!
As you can see - this is a fairly low cut deflector and I believe it will do the job nicely in the warmer weather. But one complaint from my wife (and other passengers) on my DTA was the wind issue in the back seat. I could tell they were fighting it due to the wind noise from their mics. And, what about cold weather flying? Wouldn't having a taller windscreen be nice to have?
So, as you may have noticed, I made two windshields and only used up 1/3rd of the sheet. I have a large piece to design and build a much taller shield. When things start to come together on my trike, I'll show you the process I use to fabricate a template (probably out of a one-ply cardboard sheet) to make the real thing.
Oh yea - I ordered up several dozen windshield fasteners (DARTS) from Air Creation. Changing windshields will be easy smeazy!
One other project I'm just beginning is the re-design of my instrument panel ....
Stay tuned for this one!
Hey Ttabs, I have a toll windshield from AC only for using with BioniX wing. If you need the dimension, please let me know. It makes your passenger much more comfortable for long ride.
Hey Ttabs, I'm very interested in the panel project. The cost of the cutting, but especially the painting / powder coating and the decals.
Wow! Amazing project. Thanks for the photo diary. I'm learning a lot just watching you rebuild her.
Sorry fellas - I hit the master delete button by mistake a few weeks ago and the Mod Shop went off line. Lots has been happening with plenty more mods in store.
Here's a re-boot of the fuel level sending unit ...
This unit can be cut to size and installed in your tank. First you have to get a measurement of the length you want and subtract about 1/2 inch (so the sending unit end will be about 1/2 inch off the floor of the tank)
Once you know the size, use a pipe cutter to remove the outer sheath and a snips to remove the inner brass rod.
And here you have your custom fuel sending unit ...
I'm installing mine on the top of the tank here ...
One handy tip I found is taking a file to the cutting edges of this Harbor Freight wire cutter. I flattened the cutting surfaces and they make an awesome pair of crimps. Far better than anything else I've tried. Hey - for about $1.99 - it's worth a try! (go with the larger size for more power)
Here's my Racor 2 micron fuel filter. I used a piece of hobby plywood and epoxied it to the wall for added support. The two mounting bolts there are actually also going through a RAM camera mount on the exterior for added function and support. From the filter, the fuel runs through a fuel flow sending unit and then an optional electric fuel pump. I removed the fuel shut off valve all together. Simple and clean ...
I'd like to add landing lights and so I tried on a set of these big heavy off-road LED spot lights that throw off 2000 lumens each. They are as heavy as they look!
A good spot would be up front next to the wheel. I check clearances and drilled the mounting holes ...
And here was the end result. Something about this just bugged me. They're big and heavy, and kinda unappealing to the nose of the trike (thats a camera mount on the left there).
So I came up with a much cleaner and far better solution. If you guys are interested in mounting a headlight, forget this idea and stay tuned. I'll get some more pics of the latest LED technology and where you can get them!
And here was my idea for installing the BRS cover. I carefully tapped off the area around the seem to apply silicone adhesive. I could not find yellow and I thought clear would not look as good as .... BLACK!!!
Don't wait for it to dry!!! Get after it right away or you may have a mess to deal with ...
Nice Tom I really liked you're navigation lights.really looks like you're doing an awesome job buddy! Just a little worried that xc and henery are going to overtake you're. Grammy achievements while your flight cameras are down.how about some inlayed elk ivory toggle mag switches.
thanks tom for taking time and pictures you got some great ideas.cant wait to see you fly it
Here's the final result and the hatch is well secured ...
Here's an idea I've always had. Landing on various gravel/grass fields, I had a big problem on my DTA with dinged prop blades. I've always been suspicious of the front tire causing all the problems as it kicks up gravel. But I think the rear tires may also be a contributing factor. So it's time for the 'Anti-Gravel Tire Flap' project with a twist. I'd like to build the rear wheel gravel flaps in a way that will show dings from pebble strikes. This way I can see (and pass on to you) if the rear tires can be guilty of throwing up rocks into your prop.
To start this project, I'm using scrap lexan left over from the windshield cut. I made about a 4" strip here and will cut the length to fit ....
I picked up these sheet metal benders at HF. They are handy for this job to bend this flap into shape ...
This looks to be just about the right angle for my idea ....
Now its time to fit and trim ...
I drilled 3 holes and attached with rivets ...
So I guess I'll keep an eye on these flaps and let you know if I see them beat up from rock strikes.
The front tire - being the big rock hurling culprit it is - needed a different strategy. I found the perfect flap material at a Ranching Store. It's a rubber belt about 1/8" thick and 6" wide. It's sold by the foot but the nice lady at the store gave me a generous cut of 14" for our job. The Tanarg with it's rear wheel scoop makes this install rather easy. I moved the front tire out of the way, used a hole cutter (from Harbor F of course) and made three holes in the belt (for bolts) ...
Three along the top and one on the bottom really made the flap secured.
Now - rather then cut the flap to some length, I decided to suspend the rear with a cable and screws. I can now adjust the hight of the flap and it will never get caught up in the wheel. It also adds a deflection angle so I'll try it out ...
The belt being 6" wide seemed to be the perfect fit for the Tanarg. I did also buy a 4" belt piece but it's sitting in the junk bin. Maybe it'll come in handy on the rear flaps if I need to strengthen them up.
By the way, I also had an idea for that lexan scrap as well using those luxurious Harbor-F benders. I bent a couple of flaps for the vise. Now if I have a sensitive item to clamp down on, it won't be marred by the teeth in the vise.
Stay tuned - lots more stuff on the way here.
Hey Ttabs, I'm glad you were able to resurrect this thread from when you accidentally deleted it!! It's one of the best!!
What do you think about the clear plastic for a rock deflector from the chin and wheel pants? CBurg's picture of the bristle deflector has legs too.
You know the ultimate would be a deflector that was flexible enough to bend up at about 45mph-- thus it would be down at landing speeds, but would "retract" by flexing up at flying speeds!!!
Thanks for all the ideas!!!
Hey Ttabs, I see now you already put the clear deflectors on the wheel pants-- great minds think alike!! ;)
Well I believe I have a better handle on the headlight install. I learned about these headlights at Baha Designs in San Diego. The light in particular that I chose was the Squadron LED Driving light . But when I ordered it up, they sent me the two light kit by mistake. These are nice if you want to cut the Amps down and still have 1800 Lumens of light power. The fella who recommended these to me uses this two element model (one is a spot and one is a flood) and he loves it!
Anyway, I opted for the 4 element 'Driving' model that has two spots and two floods. It pulls 42 watts (vs 21 watts with the two element model) but blasts an amazing 3600 lumens!
In comparison to those big gawdy things I was going to use, these are smaller than one of them and weighs about half of one of the big ones yet blasts out nearly twice the lumens!
The mounting profile is much tighter also ....
So I did the install. Be advised that Baja Designs will void the warranty if you cut their big 1" plug off. No way I'm going to drill a hole that size in my trike for their plug. That sucker got snipped off with out giving it a second thought. Connect the white to pos and black to neg. Not sure what the big deal is with that!
Now dosen't that look a whole lot better than before?
And for the final function check ...
I think this is going to be a great solution for landing lights if you are considering an install of your own.
As far as the wing goes, I finally had good weather to get it assembled and tweeked. Nothing fancy as it's just a bone white material. I will play around with sail tape later (if I even get around to it) to add a color pattern. I also installed the running/strobe light wiring harness inside the wing and secured with zips. I already have the PowerBurst strobes mounted on the winglets - ready to go. Once I had the wing assembled, I folded it back up and it's ready to take the trip to the airport.
I should mention that 20 minutes after I started the wind picked up to about 10-12 mph. Wind chimes were going nuts. Isn't that how it goes though?
OK - this next report should have been one of great disaster with heavy carnage. That is re-designing the instrument panel. These are unchartered skies for me. There are so many little things that could go wrong I'm not sure what the hell I was thinking!
But - as it turns out I have a remarkably happy ending.
It started with the idea of adding a Grand Rapids EIS 4000 computer. If you want to see what this thing does, check it out here. It literally could replace every instrument on the original panel and add 10 times more cool info. So I ordered mine with everything but the fuel flow indicator. Not that fuel flow is not important - quite the contrary. But I already own an MGL fuel meter/gauge so I opted to keep my MGL and let the EIS display other import info. I ordered the VSI/Altimeter (not sure exactly why yet) Fuel Pressure Gauge, Amp draw meter (to tell me what I'm pulling off the alternator), and as you saw earlier, the fuel level sending unit. I also got the 4 EGT sensors and two CHT sensors. The EGT's are a big deal and can tell you all kinds of stuff about what happening in each cylinder. Here's the install of the EGT ..
And for the CHT's (one on each side of the engine), you simply unscrew the CHT rotax sending plug and add the GR CHT ring sensor ...
I ordered my EIS with the wire bundles cut to 8' lengths - and believe me - between the two bundles of wires you need to run - theirs a lot of wires. If I could do it again, I'D ORDER THE BUNDLES IN 10' LENGTHS. I barely had enough wire to plug in the unit when installing the instrument panel. Here's what the wire bundle connection looked like when I finally hooked up all the CHT and EGT sensors ...
Thank God for Zip ties!
Over at Precision Cutting Technogies, I worked with a Cad Design Engineer to come up with a layout of my new panel based on the shape of my old panel which they took precise measurements of.
When I thought it looked good, he had a plastic template cut for me to evaluate. This was a lifesaver! I found that designing a busy instrument panel is like a puzzle and everything has to fit within very tight tolerances.
Fits nicely ...
I then checked for potential instrument problems like this one. This wire harness bundle that's held in place by the two switches blocks completely my access the the two bundle plugs on the back of the EIS. I had to relocate the switches and move the starter switch as a result ...
So with a template, fit is accessed and ugly problems show up early. Once we made the necessary corrections to our layout, we simply ran the order through the laser cutter and it's done to perfection. They even dropped it off at a nearby powder coating place for finish.
And walla - a new instrument panel is born! Even my dog Rex marveled for a moment at its beauty compared to the old panel!
I didnt' waste any time loading back up the instruments and now you can see my new layout ...
So from here, I inserted the panel into it's new home. And it fit like a glove! (well, a rather tight but workable glove! :D)
So the take away here fellas is that it can be done and going through a Cad design shop is a must. Use of the template will avert disaster before cutting the final product. Oh yea, having a dremel handy during the instrument install made fitting the switches and warning lights and any other tight spots easy. Cost was $200 to have this panel made. If you have a Tanarg and want to do something like this let me know. I've got the CAD file saved and it would be just a matter of tweeking the instrument clusters to your needs.
Looks great. Was it you who mentioned that a change from metal was desired due to intermittent instrument problems with a metal panel? I read this recently. Talk was of fiberglass, Lexan, plexi...
I have not heard of anything like that. Maybe it would effect my compass if anything.
It wasn't the compass, it was the elctronics on aluminum panels. I'll see if I can find the thread.
Hi, It's amazing what you had made lots of improvements on your trike. Mine is still under the carport right now. My first project is to work on the instrument panel, then add fuel gauge, sending unit in the gas tank, repairing the damaged fiberglass, and paint.
I'm learning alot from you.
Will the Racor fuel filter works for 2 stroke?
I believe it will work just fine so long as your fuel pump is in good shape.
DECALS & N NUMBERS
well I had to replace the N numbers and was looking for a solution. I found a sign company here in Spokane that can handle any decal at any size you would be interested. They make advertising and business signs and this was a layup for them. Heck - they can even print a picture on a vinyl media to paste on. So the sky's the limit with these guys. I ordered up my N-numbers, picked the font, color, size and gave them the specs from the FAR AIM. Then I threw in a few more decals I wanted so as to give my bird a personal touch.
To set the location of a decal, I used painters tape to get the positioning and levelness I was looking for ..
And wham! There it is!!!
Hey - I'll bet you don't have a Terror-dactyl on your trike!
BAM!
I made the N numbers a gray tone cuz I was not sure if I was going to past them on the black fins. Well - I didn't! lol
BAM!
Decals made easy if you find the right source! Oh yea - cost was $70. BAM!
-HEADLIGHT UPDATE-
Well tonight we finished off the Alternator install and the wiring was amazingly simple! 40 amps of juice are now flowing through the veins of this beast. Since the trike build was complete, we thought we'd turn the engine over in the shop until it sputtered just to see if the battery light would go out. LOL - THE THING FIRED RIGHT UP!!!! HIT THE KILL SWITCH !!!! HIT THE KILL SWITCH !!!! That I guess was a pleasant surprise that the motor leaped to life after a 5 year hiatus!
Anyways, since it was dark outside, we wheeled the trike out into the erie night abyss to give that headlight a try. Shooting about 200 yds across a field to the back of my neighbors shop- IT LIT EVERYTHING UP AND THEN SOME! WHAT A POWERHOUSE. We were both very impressed with this little light from Baja Designs so it now comes with my strongest recommendation! Even the two bulb model now I would consider to be an excellent choice if you're counting your Amps.
I've got pics of other projects including the alternator install so stay tuned!